
This guide is a basic overview of all the side quests for the current Helm’s Deep Big Battle instances, focusing on 1-player strategy.
Learning to complete all of these quests on Platinum is very important since all of your Big Battle promotion points come entirely from earning medals on these quests and the main defense quest.
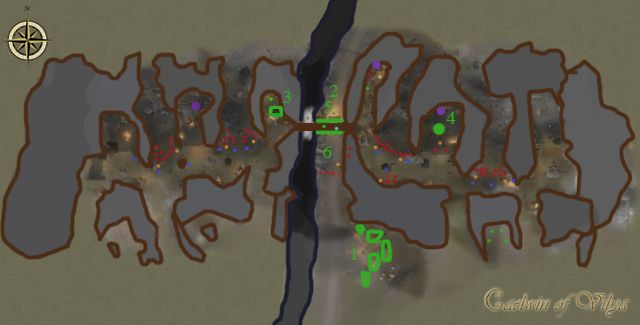
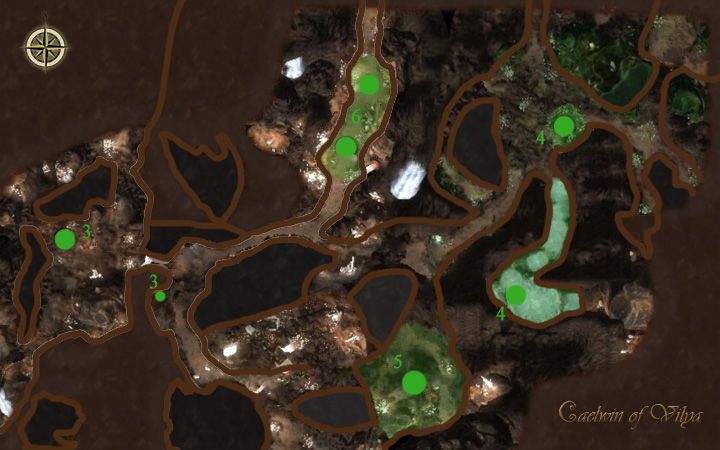
For the maps, color coordination is:
Green - Side Quest Objective Area
Red - Rohirrim Soldiers (note: positions are not exactly as appears in game)
Orange - Rohirrim Commanders
Blue - Rohirrim Banners (Flags)
Purple - Siege Weapons
Helm’s Dike
Protect the Horses - 1
Trigger - 1st Wave East Side
Basics - Behind the wall on ground level there’s a small stable with horses. Orcs will attack from the river, attempting to kill the horses. If a horse hits 0 HP, it runs away and you lose merit. Probably one of the easiest side quests to complete. Just stay in the battle and fight off the orc waves.
Tips
- Don’t panic if something gets attacked. Horses are pretty hardy. Focus on killing individual targets as fast as possible
- Pre-load haste/damage buffs on soldiers as you see a wave coming in
- Rank 2+ Engineers can place tripwire traps right next to the horses to buy a bit more time.
- If a horse gets really low you have the option to "release" it for a lower merit loss. This is pretty much not needed or worth the time
A Stone Obstruction - 2
Trigger - 1st Wave West Side
Basics - Takes place on the main wall of the Dike. Once the quest begins archers will appear along the wall and once commanded will shoot down the Dunlendings bringing stones to block up the river. Each archer will shoot for about 15 seconds and then must be re-tagged. Your archers on the West side wall will also come under attack and need to be protected. Probably one of the harder quests for the instance, just because of the archer rotation and the quest bugs.
Tips
- For Rank 1 Engineers setting up barricades on the western approach can help slow down the waves enough that they won't always overwhelm your soldiers
- Setup a rotation to hit your archers and keep them firing
- Jump back and forth between your archer rotation and clearing out attacking mobs
- Orcs coming from the west will often bug out your defenders if they pass the line, the enemy buildup can lead to a serious overload that will destroy all your defenders on the left and cause you to lose
- Keep reinforcing the left side commander as much as possible with DPS and buffs
Guarding the Watch-Tower - 3
Trigger - 2nd Wave West Side (East Side attacked first)
Basics - On the western side of the wall there’s a 3-story watchtower near a group of main defenders. Additional orcs and Dunlendings will attack through the main wave and attempt to destroy the tower. This quest can get a bit buggy and overwhelm your defensive line on the west side if too many orcs get behind your soldiers.
Tips
- Stay near the tower, attempting to pre-empt the wave will probably cause you to miss tower attackers in the mix
The Statue of Helm Hammerhand - 4
Trigger - 2nd Wave East Side (West Side attacked first)
Basics - On the eastern side of the wall (in between the two main defender points) there’s a statue inset on the wall. Pretty much operates the same as the Tower attack with a few extra trolls. You need to protect the statue until you’ve killed 5 trolls
Tips
- Same as the Tower, stay near the statue so you can hit them as they come in and burn them down as fast as possible.
- Focus the trolls as soon as possible
- Hitting mobs early (before they clear the first soldier line) will often mess up their pathing causing them to get stuck. This is especially advantageous for the trolls
- The last wave tends to have 2 trolls, this can cause some serious damage to the tower as you try to burn their HP. Try to hit them early to enrage them and/or CC one troll away from the tower.
- Keep the closest main line commander or the Helm's Statue Commander buffed
Flames at the Gate - 5
Trigger - 3rd Wave Center (Random)
Basics - In the center section of the wall, archers will appear on the battlements. You need to keep the archers resupplied with arrows and bring down the flame tank hitting the main gate. Probably one of the most difficult as the archers are on the top of the wall and repairing/dousing the door is on the ground level. Also a reasonably hard quest to complete perfectly.
Tips
- Very easy if you've got a decent rank in Engineer. Set up a small catapult overlooking the gate from the bit of the dike that juts out to the North (towards the ballista) before you start the fight with Gamling. you can heavy shell + 2x crank to do damage directly.
- Resupply the archers in sequence continuously, try to do this as much as possible without losing the door
- The arrows to resupply are stupid hard to see and click on in some cases. Usually they're located reasonably near or behind the archers up on the wall. They also periodically respawn
- About 1/3 of the way through, finish your resupply sequence then jump down to the door to check it’s HP. Douse/repair quickly then jump back up to the archers
- Rinse and repeat as necessary
- Duos should have no problems with one man on the wall resupplying arrows & DPSing invaders that get past the west line, and the other on the ground extinguishing the door
Powder at the Gate - 6
Trigger - 3rd Wave Center (Random)
Basics - Behind the wall on the ground level (same as with the horses) orcs and goblins will come from behind to try and blow up the door with explosives. You just need to fight the waves as they come to prevent them from getting to the door. Not quite as bad as Flames solo, but can be difficult if you get a bad round.
Tips
- You can go pretty far down the road to engage mobs as they spawn, do it, you get way more DPS time
- Focus ONLY on the mobs that will get to the door (pretty much anything carrying powder casks)
- If you’re a low level Engineer (or any level officer/vanguard) only try to disarm tiny/small (maybe medium) powder casks. Trying to do the big ones will usually take too much time and cause you to get overwhelmed.
- If you're a mid level Officer, setting ordering the Rohirrim Commander to set his soldiers into 2-Handed Stance really helps their DPS, and survivability is not an issue for this quest.
- If you’re doing a duo it’s worthwhile to have 1 member try to disarm any cask (although with 2, none should make it to the door)
- High level engineers with faster disarm should try to pick up everything, big casks to a lot of damage
Deeping Wall
Side note: Starting any of the side quests (or really just in general) with any of the enemy catapults still active will pretty much cause you to lose the main battle. Take the enemy catapults out early with 2 well placed, max crank shots from your catapult.
Breaching the Hornburg
Trigger - 1st Wave (Random)
Basics - On the western side of the wall in the guard tower (the one with the injured Rohirrim) enemies will come up through the wall in 6 waves and attempt to kill everyone inside. This is a really easy side quests with no major mobs. Anyone with decent DPS should be able to complete this one no problem.
Tips
- Use haste/damage buffs as they become active
- Focus on mobs hitting the supplies, they have less HP and burn, injured Rohirrim and other NPCs are a little hardier
- For Engineers, setting up Tripwire Traps underneath the windows can make it easier to knockdown and delay mobs for easy AoE
The Vanguard Defilers
Trigger - 2nd Wave (Random)
Basics - On the main section of the wall, Orc Shamans and Defilers will periodically come over and attempt to reach the back of the wall. If they get there, they will almost instantly place a totem that will spew defiler goo causing you to lose merit. NPCs will do an OK job stopping some of them but will lose 100% of the time if left alone, but this is a reasonably easy quest if managed well.
Tips
- As soon as the quest starts it may be helpful to knock off grappling hooks and ladders to relieve some of the mob density to make it easier for NPCs to target
- Only knock off ladders/hooks until the first shaman comes over the wall, then ignore them for the rest of the quest
- Watch the front of the wall only for Defilers/Shamans. Don’t engage anything else, just burn them down ASAP as soon as they come over the wall.
- If a totem gets put down, it is priority #1, they goo spewing process chews through merit super quick
- Use all commander buffs as soon as they come up. It usually easiest to hit the center commander since his soldiers will break to both sides.
Securing the Culvert
Trigger - 1st Wave (Random)
Basics - Takes place on the ground behind the wall. Run through on the East side tower, or take the quick access. Probably one of the harder initial quests, once you get the hang of it, it’s actually relatively easy. For this quest, 4 workers will attempt to (painfully slowly) place rocks at the culvert entrance while orcs, Dunlendings, and trolls come through.
Tips
- You can also speed up the completion by interacting with the rock pile and carrying stones yourself. There's usually enough time to grab a stone between waves if your quick.
- The Culvert Workers are extremely vulnerable. Priority 1 is always killing the Dunlendings that focus the workers
- Try to engage the incoming mobs at the culvert itself, but break off if a Dunlending follows a worker behind you
- It’s sometimes helpful to use Damage buff on the Soldier Commander when a troll is coming in (if close enough)
- Use Haste buff on the Worker Foreman whenever up
- Use Armor on the Worker Foreman as the workers approach the culvert to lay rocks (if close enough)
- Monitor your Culvert Workers and save Heal for the Worker Foreman as needed
- Engineers can place tripwire traps at the culvert entrance which will stun and group all incoming mobs, making it easier to DPS and adding a second of extra protection for workers
Vandals in the Tower
Trigger - 2nd Wave (Random)
Basics - On the East side of the wall, there’s a winch and a few boxes of supplies. Goblins will climb through the walls and attempt to blow up everything in the building. You need to cut them down as they come through. The tight quarters and inability to target things while they’re standing in the window can make this a bit more complex but with some luck it is pretty easy.
Tips
- Stand a little back from the window so you can see everything as they come through
- Tab-target to select the sappers as soon as they become targetable
- If a powder cask gets placed, try to disable it immediately or you’ll probably lose 1 or more supply boxes
- Use haste/damage as soon as it comes up
Deeping Coomb
Searching the Debris
Trigger - 1st Wave Glittering Caves
Basics - In the rubble straight back from the center of the battlefield, various supplies and trapped Rohirrim need to be rescued. At the same time you have to fight off waves of mobs and disarm any remaining powder casks. This quest also has a countdown timer which makes speed super important.
Tips
- Be in position if you know you're going to get this quest, every second counts
- The waves are pretty weak but will mess things up. If possible set up tripwire traps near the bridge and change the rear-guard commander to 2-handed stance to better deal with adds
- There is a bug with the timer on this quest that makes it difficult to finish properly, try and rush to save all the wounded Rohirrim ASAP
- There is a cooldown timer on Rohirrim healing, having an Officer here can help speed up the process
- The rubble piles are "unlocked" sequentially meaning that piles you may have passed earlier are not glowing and ready to be clicked until you've opened others.
A Pillage Denied
Trigger - 1st Wave Hornburg
Basics - On the far eastern side of the wall there are a few supplies and some huts. Groups of orcs and trolls will come in down the stairs from the main wall and run towards these objectives to try and knock them down. A reasonably easy quest with a few minor hiccups depending on luck.
Tips
- Mobs are able to be targetted almost as soon as they come down the stairs. Engage early to help increase your DPS time.
- Focus on Trolls as they come through to burn them down, they’re a big NPC distraction
- Supplies are more vulnerable than huts, but powder casks on huts can be devastating, prioritize targets according to your current damage levels
- NPCs are reasonably good at cleaning up stragglers, but they will sometimes miss things. Keep an eye out for unattended orcs whacking your huts
Defilers in the Water
Trigger - 2nd Wave Glittering Caves (Hornburg attacked first)
Basics - In the east side, in the far back across the bridge, there’s a water wheel and a pool of water where defiler’s will spawn and begin releasing dark-waters into the area. You need to burn down the defilers while not allowing the dark-waters to pass beyond the confines. Depending on your DPS, this can be easy or hard. Ranged classes tend to be a little safer here.
Tips
- Burn down the defilers ASAP, can’t stress this enough. You’re almost guaranteed gold if you just straight kill. Our DPS is so high now this is usually the best course.
- If you’re duo, or looking to do Plat solo, be a little more discerning about spawned dark-waters. Take out the first rounders, and then ping-pong between dark-waters and defilers
- Always prioritize Dark-waters. They have very low HP (around 5k). As soon as you're done killing the ones that have spawned, go back to defilers ASAP. The spawns are staggered so stay vigilant.
- Merit loss occurs at 2 levels, dark-waters leaving the pool and dark-waters leaving the watermill. Pool is hard to contain, but minor, watermill is easy to contain and causes huge merit loss if you screw up
- The quest takes a little while to start after the round switch, but make sure you're at the windmill before it begins.
Prepare to Fall Back
Trigger - 2nd Wave Hornburg (Glittering Caves attacked first)
Basics - Behind the main line, Rohirrim engineers will begin setting up traps, barricades and fire to slow down the enemies as your forces begin to fall back. Mobs will come through in waves and try to destroy those objects and kill the engineers.
Tips
- Make sure to set your back line soldiers to 2-handed stance
- Prioritize defending the engineers as they're pretty squishy and can get lost in the fray with mobs on them
- Pretty much just a DPS race, get barricades and traps up front to slow the assault waves, then DPS them down as quickly as possible
Glittering Caves
Cave In - 1
Trigger - 1st Wave East Side (Gimli)
Basics - Waves of orcs will come through trying to get past you and overwhelm the defenders. You need to hold the line until Gimli is able to cause a cave in.
Tips
- Place a Ballista directly in front of where the barricades will show up (on the side the mobs are coming).
- Aim as close as possible and place a barricade as close to the ballista target crosshairs place a trip trap in the same spot. When the mobs come through and are stunned hit them with the Ballista.
Bombs and Bats - 2
Trigger - 2nd Wave West Side (East Side attacked first)
Basics -
Placeholder
Tips
Stalactites Over the Bridge - 3
Trigger - 1st Wave West Side (Gamling)
Basics - Behind the main defence area on the west side (Gamling), back up the ramp is a ballista (you probably passed it on the way in). You need to protect Gamling and the supplies from extra mobs running up the center as he fires the ballista. The distance and the number of mobs makes this relatively easy, but poor positioning can cause merit loss. Luckily, even a poor performance on this quest (significant supply loss, soldiers and Commander dead) will still net silver.
Tips
- There are 3 signal flags that can be used to direct Gamling to fire the Ballista
- For the most part, stay in the center by the supplies and AE DPS as much as possible
- Don’t stay near Gamling, pretty much all the mobs except for a select few come through the center and will quickly overwhelm your soldiers there.
- On the flip side, don’t leave Gamling alone the whole time because mobs will backdoor and destroy barricades / Ballista for even worse merit loss, and/or make it take longer
- Use haste/damage buffs on the center area to keep mobs burning down.
Spider Assault - 4
Trigger - 2nd Wave East Side (West Side attacked first)
Basics - In the central area off to the west side, there is a huge crystal near a tunnel covered in spider webbing. For this quest you need to stop the waves of spiders from reaching the crystal and adding webbing, free Rohirrim soldiers from the cocoons, and kill the spider queen at the end of the tunnel. Given the relatively weak NPC defenders at this location, coupled with the high HP spiders, this can be a difficult quest to complete solo.
Tips
- The quickest way to a good completion is to just push in towards the spider queen. Completing it early seems to give you credit for the unlaunched waves, which is good.
- As soon as the quest starts, push down the spider tunnel until you hit the first wave. DPS them down as much as possible, then keep moving forward, don't worry about actually killing them
- As the waves increase to 3 spiders, switch to AE DPS as you move forward.
- The spider queen is very weak and goes down quite quickly, she has two defenders but they are not agro linked and can be pulled solo.
- This strategy is quick, and has a relatively good payout, but can be extremely risky. If you don’t do enough DPS, your NPCs will not be able to stop the spiders before they web and the 25% to major merit loss happens pretty quickly.
- Ignore the Rohirrim in cocoons unless you’re duo. There’s only about a 10-20% chance for them to be in there and it takes way to long
- Alternatively, you can wait just inside the spider tunnel, burn down each wave, then traverse through the tunnel, open the cocoons then kill the boss. This is safer, but keeps you away from the main battle far longer, for (unless they fixed the bug) a minor reward increase. It's also possible to fail if you take too long and the main battle ends.
Civilian Defense - 5
Trigger - 3rd Wave (Random)
Basics - This quest takes place just to the east and south of the large group of non-interactive NPCs in the starting area. Down a ramp there will be 2 barricades that form a secondary line from the main battle. For this quest you need to hold these barricades against trolls and Orcs that are coming up to kill the civilians. This is a relatively easy quest with a very limited defensive scope and easy number of mobs.
Tips
- Just stay at the barricade and DPS things down
- There was a bug in beta where you could fail or lose merit for killing trolls too quickly, not sure if that’s still around
Preparing the Charge - 6
Trigger - 3rd Wave (Random)
Basics - North of the starting area (with the civilians) there is a tunnel that’s blocked by multiple barricades. Once you receive this side quest, you can access the tunnel and then need to start destroying enemy barricades, traps and debris while fighting off Orc invaders.
Tips
- If you have an engineer spec, make sure to have it active as most of the quest involves disarming things
- Watch for the tripwires, they’re rather difficult to see and hitting them causes merit loss
- The quest is on a fixed timer, so make sure you clear the 3 bosses before it ends, for best results, kill 2 bosses, then remove traps, making sure you leave enough time for the final fight
Hornburg
Side Note: The main fight for the Hornburg has a number of siege ladders and grapplings hooks that hit the main walls. Disabling these takes quite a bit of time and they will be refreshed throughout the course of the battle. In downtime (especially for duos) keeping these knocked off can help reduce the stress a bit while you're away on a side quest, but it is far from necessary and for the most part NPCs can hold just fine if you never do this.
Bringing Down the Siege Ladders
Trigger - 1st Wave (Random)
Basics - On the east side of the wall, up on the tower with the catapult, siege ladders and attaching hooks will land on the wall. Orcs and Goblins will climb up and attempt to destroy your catapult and you supply boxes. This quest is relatively easy for the most part, but a bad ladder roll combined with Trolls can be surprisingly difficult.
Tips
- It helps to repair the catapult as much as possible early on in the battle before you receive the quest, just for a little extra buffer
- All ladders are held on with grappling hooks that need to be attacked (like an NPC) and destroyed before the ladder can be removed.
- When attacking ladder hooks, it can sometimes help to save your AoE damage for right after ladder-climbing mobs get over the wall and become targetable
- Removing the ladders as fast as possible will immediately complete the quest, this is best, but unless you’re on your very last ladder, they are not priority 1.
- Priority 1 is any goblin sapper carrying a powder cask. These will light multiple supplies on fire or seriously bone your catapult
- Also make sure to help out with any trolls as they can do serious damage and prevent allies from saving important targets
- Ladders are not priority 1, but don’t ever let more than 2 exist at one time or you’ll get overwhelmed
- Any ladder left over after you complete the quest will continue to spawn orcs and goblins for the remainder of the fight.
- If you screw this one up bad, they can destroy your catapult leaving you without one for the rest of the BB.
Repair the Portcullis
Trigger - 1st Wave (Random)
Basics - Inside the East Side tower, there is a doorway that will be destroyed once this quest activates. You need to assist the workers in repairing the gatehouse portcullis in order to stop the orc invaders. This is a somewhat difficult quest due to the vulnerability of the repair workers and the short DPS distance given to the invading mobs.
Tips
- As soon as the quest starts, grab a box of supplies for an easy merit increase
- You can also help to repair the portcullis winches. This may be beneficial if you have enough engineer spec or are duo, but otherwise isn’t helpful
- Supplies are in multiple areas, grab these in between mob waves
- Save your heals and armor to support the workers, hit your haste/damage buffs when a wave is coming in
- Most of your time should be spent priority targeting and DPSing any mob that targets your workers.
Protecting the Gatehouse
Trigger - 2nd Wave (Random)
Basics - On the west side, there is a trapdoor in the floor that will drop you down to the gatehouse and let you fight off the battering ram. After the ram, there are waves of mobs which will stream in and attempt to destroy the door. This is a pretty easy quest provided you’re able to get the ram down fast enough, but solo it's incredibly difficult to get the ram killed fast enough to get plat.
Tips
- Get in position right away, if you can’t stop the ram early it does enough damage to fail the quest within about 30-40 seconds
- Prioritize incoming mobs to protect the workers from the Orcs
- After the ram is down, waves come pretty slowly giving you time to repair or place traps
- Use haste/damage buff right away to help DPS the ram, keep using them as soon as they're up
Winches in the Windows
Trigger - 2nd Wave (Random)
Basics - Probably the easiest of the available quests. Once this activates, goblins and orcs will start climbing through the west side tower and attempt to kill the defenders, destroy supplies, and raise winches to bring up more enemies.
Tips
- Goblin Vandals will come up and then randomly wander to a window and begin winching, once they start you have about 5-10 seconds to stop them before they get a winch setup.
- Prioritize the Vandals, they’re pretty easy to kill, especially when they group up
- A few 15-20k orcs will also come up the windows, it’s helpful to add DPS to these and support your NPCs, but never stop prioritizing the vandals. For the most part your NPCs will hold.
- If a winch does get placed, this is an immediate priority to get removed. Honestly, if you’re doing things right this should almost never happen
The Final Blockade
Trigger - 2nd Wave (Random)
Basics - Does not appear to be currently available.
Tips
Results 1 to 25 of 138
-
Dec 02 2013, 02:35 PM #1

 Member
- Join Date
- Apr 2007
- Posts
- 374
Helm's Deep Big Battles - Side Quest Guide
Last edited by Gedrevn; Mar 26 2014 at 04:37 PM.
[charsig=http://lotrosigs.level3.turbine.com/0b20c00000000a2d6/01003/signature.png]undefined[/charsig]
-
Dec 02 2013, 02:42 PM #2
Member
- Join Date
- Apr 2007
- Posts
- 374
Deeping Wall - Raid
All credit to Utleth for researching and writing up most of this section. You can see his Original Post with more details HERE.
Breaching the Hornburg
Trigger: First Wave - Western Wall
Difficulty: Very easy
Basics
Adds will try to kill 6 wounded soldiers as well as, destroy a door and some supplies located back in the room.
Tips- Just have your side quest team waiting near the door. When the door opens, get inside and put your triple-wire traps by the right window and just kill everything.
- Move the barricades from the eastern tower and put one in front of both windows.
- If you don’t trust your dps to kill everything fast just get someone to heal the wounded soldiers, supplies, and stand by the door to do some repairs if needed.
- It can help to overload your DPS team for the first wave, that tends to be the largest, quickest group. Once they're dead it's pretty clear sailing
- Bringing down a small catapult can make wiping out waves from the stream very easy
Vandals in the Tower
Trigger: First wave - Center Wall
Difficulty: Moderate
Basics
Downstairs and by the left tower you get like 2-3 adds per wave. On the right room, it can get a little nuts, you get some time 6-8 adds at the same time. In the left tower, adds will try to destroy the supplies and the winch. In the culvert, they will try to destroy supplies. On the right side, they will try to come through and kill defenders and supplies.
Tips- You know that you will get that quest every single time you are in the center wall on the first wave, so prepare for it before it comes.
- The winches are at the back of the left and right tower, if you lose either of these you fail and get nothing
- Assign 1 person to blow up the waves regular waves with catapults before they get to the wall to free up PCs needed to defend the main walls.
- Assign 2-3 people by the Culvert that's where the adds will come from to try to attack the bottom supplies. Make your stand there and kill them far away from the supplies area.
- Always set tons of tripwire traps.
- Assign 2-3 people in the room under the left tower. Put tripwire traps by the 3 windows. Kill everything and diffuse any bombs.
- The other 5-6 people need to hold in the right room (west). If you have too many adds, all you need is more people in there.
- Right room adds come from both the windows and the wall, keep a 2 front defense.
- At some point the catapult person will not be able to kill anything else any more so he should join the people on the right room
- Things get really crazy by wave 14, so you may need to pull one more from left room (leaving just 1-2 people there) and bring one more to the right side.
Assault on the East Tower
Trigger: First wave - East Wall
Difficulty: Very Easy
Basics
Orcs will come running up the East side and try to kill laborers in the tower.
Tips- Assign 4 people to defend the bottom room, 2 people to defend the middle room and 2 people upstairs by the catapult. Kill stuff and protect the labors.
- It can help to grab extra barricades and put them in front of the bottom room door, and on the stairs, this will slow down the attackers coming in to an incredibly easy pace.
Securing the Culvert
Trigger: Second Wave - Western Wall
Difficulty: Easy
Basics
All the second waves side quests, no matter the wall, will take place downstairs behind the wall. Kill stuff, keep the labors alive and wait until the Culvert is sealed.
Tips- Move your side quest team downstairs and find the Culvert. Don’t wait for the quest, be there before it comes!
- Set a lot of tripwire traps by the entrance and just kill everything.
- Have barricades brought down and setup inside the culvert in front of the workers, do most of your DPS here.
- At some point you’ll get 2 Trolls, assign 2 people to run after them and kill them, they are untargettable until they finish setting up.
- If you don’t trust your dps team, assign a healer to the labors so they don’t get killed, THEY ARE VERY SQUISHY.
Siege Under Fire
Trigger: Second Wave - Center Wall
Difficulty: Easy
Basics
This quest starts downstairs behind the wall. In this one again adds will come from the Culvert and from the river in between the two houses where the Flanking Foe quest happens. Orcs will come through and try to destroy the supplies there.
Tips- Assign 4 people by the Culvert and 4 people by the river between the 2 houses. Just kill everything far away from the supplies they are trying to destroy
- Assign at least 1 person to go up on the wall for the catapults (officers work best) to cover adds and heals there otherwise \/
- Have someone from the side-quest team go upstairs to check adds around wave 6. For some reason in this quest you get a lot of adds upstairs on the left and right catapult. If they wipe the soldiers there they will steal platinum from the main quest and/or come down in a massive group and screw up the whole main battle.
A Flanking Foe
Trigger: Second wave – East Wall
Difficulty: Easy-Moderate
Basics
Orcs will come through the culvert and on the west side behind the Wall and try to kill the cadets and laborers carrying supplies. This quest is broken, Gimli's patrol finishes far sooner than the laborers' rock dropping. Sometimes you’ll be able to force a completion, sometimes it will bug out and only let you get silver.
Tips- Get lots of tripwire traps down before the quest starts.
- Start downstairs behind the Eastern Wall. Have 4 people follow Gimli and his cadets during his patrol.
- Work hard on keeping the cadets alive they die like papers. Try and make a stand by the Culvert and kill everything there so the adds will never even get to see the cadets.
- Assign the other 4 people to defend the laborers that are carrying supplies. Secure the area behind the 2 houses. Adds will come from the river.
- As you kill the last mob attacking from the culvert, Gimli ends his patrol early, so it can be useful to have a tank guard force aggro/aggro hold a single mob from that group until you finish.
- Stop firing catapults for this quest, you need as much time as possible and just keep everything on the wall healed up (ideally leave 1-2 minstrel/RK/LM R6 officers up on the wall)
Shells in the Air
Trigger: Third wave - Western Wall
Difficulty: Easy
Basics
In this quest you’ll have some Orcs coming from the Wall. They will try to putdown some banners. Just have everyone looking for those Orcs. Kill them, making sure you diffuse any banners that an orc might put down. You’ll also have to carry some healing supplies that are on top of the tower by the catapult in the right.
Tips- Assign 2 people to keep running upstairs to get the supplies and run to deliver them to the HornBurg ( the door will open on the left side of that wall) until all the Orcs are dead.
- Set 10 people killing Orcs and watching for banners and 2 people caring supplies
- The supplies are on the east side by the catapult (the ones that don't have Morale) and need to be carried back to the Hornburg - Do this right away & for the whole quest.
- Keep your eyes open for the banner orcs. The only thing that can go wrong is your team miss an orc, they put a banner down and you don’t diffuse it in time.
The Vanguard Defilers
Trigger: Third wave - Center Wall
Difficulty: Easy
Basics
This quest is pretty much the same as the Shells in the Air. First, you have to kill a big guy that will spawn in the middle of the wall.
Tips- As always, set up before it start since you know you’ll get this quest if you are in the center wall by the third wave. Like the Vandals quest, you’ll have to set up traps on the left and right rooms by the windows.
- Start putting traps down as soon as you get to the wall, don’t wait for the quest. By the time the quest starts you should have traps everywhere in both rooms.
- After around 30 seconds the named defiler (Dagri) will spawn on the center wall.
- After a bit regular defilers will spawn in the towers from the windows and come up from the main wall. They like to run downstairs and put totems there so make sure you do not miss any defiler running down!
- Have everyone DPS the big one for the first 20-25 seconds, then send 4 people to the left room and 4 people to the right room. Let the wall team finish the big one.
Bred for Battle
Trigger: Third wave – East Wall
Difficulty: Easy-Moderate
Basics
For this quest, you have to fight 3 Uruk SHAK-HAI. One will spawn by the wall, the second will be in the middle room half way to the catapult, and the last one is upstairs by the catapult.
Tips- Split into 3 groups, have 4 people killing each boss.
- Make sure you interrupt and remove any corruption on them or they will use abilities and take your platinum away. Corruptions have a 4 second timer before they go off.
- Best way to do is straight DPS all 3 in one minute so they don’t even have time to go funny doing silly stuff like killing people and using abilities.
- If possible, try to bring all three bosses together in the same place so you can AoE DPS
Glittering Caves - Small Fellow
Cave In
Basics
Placeholder
Tips
Bombs and Bats
Basics
Placeholder
Tips
Stalactites Over the Bridge
Basics
Behind the main defence area on the west side (Gamling), back up the ramp is a ballista (you probably passed it on the way in). You need to protect Gamling and the supplies from extra mobs running up the center as he fires the ballista. The distance and the number of mobs makes this relatively easy. Even a poor performance on this quest (significant supply loss, soldiers and Commander dead) will still net silver.
Tips- There are 3 signal flags that can be used to direct Gamling to fire the Ballista
- For the most part, stay in the center by the supplies and AE DPS as much as possible
- Use haste/damage buffs on the center area to keep mobs burning down.
- Don't forget to hit the signal flags to keep Gamling firing.
- If you need extra support, you can move barricades from up by Gamling down to the main battle.
Spider Assault
Basics
In the central area off to the west side, there is a huge crystal near a tunnel covered in spider webbing. For this quest you need to stop the waves of spiders from reaching the crystal and adding webbing, free Rohirrim soldiers from the cocoons, and kill the spider queen at the end of the tunnel. Given the relatively weak NPC defenders at this location, coupled with the high HP spiders, this can be a difficult quest to complete solo.
Tips- As soon as the quest starts, push down the spider tunnel until you hit the first wave. Put down a barricade and a tripwire trap and have your best AE DPS burn them down.
- Your other two party members should spend as much time as possible unwrapping cocoons. Don't forget they respawn and you can go hit them again.
- As the waves increase to 3 spiders, you may need to switch one person back to DPS if your AE DPS'er can't handle their HP
- Don't aggro the boss until the very end, killing the boss will end the quest early.
- This quest is still bugged and even if you do everything right you often will not be able to get enough Rohirrim (5-6) in order to get Plat.
Civilian Defense
Basics
This quest takes place just to the east and south of the large group of non-interactive NPCs in the starting area. Down a ramp there will be 2 barricades that form a secondary line from the main battle. For this quest you need to hold these barricades against trolls and Orcs that are coming up to kill the civilians. This is a relatively easy quest with a very limited defensive scope and easy number of mobs.
Tips- Just stay at the barricade and DPS things down
- There was a bug in beta where you could fail or lose merit for killing trolls too quickly, not sure if that’s still around
Preparing the Charge
Basics
North of the starting area (with the civilians) there is a tunnel that’s blocked by multiple barricades. Once you receive this side quest, you can access the tunnel and then need to start destroying enemy barricades, traps and debris while fighting off Orc invaders.
Tips- If you have an engineer spec, make sure to have it active as most of the quest involves disarming things
- Watch for the tripwires, they’re rather difficult to see and hitting them causes merit loss
- The quest is on a fixed timer, so make sure you clear the 3 bosses before it ends, for best results, kill 2 bosses, then remove traps, making sure you leave enough time for the final fight
- Disarm Traps as you come across them, but don't worry about getting them all, Barricades and fire extinguishing gives way more merit, and there's more than enough items to get Plat without disarming everything.
- Mobs don't social aggro, so to speed up time, have 2 people clear and 1 person pulling the next area to get it ready.
Helm's Dike - Fellowship
Protect the Horses
Basics
Behind the wall on ground level there’s a small stable with horses. Orcs will attack from the river, attempting to kill the horses. If a horse hits 0 HP, it runs away and you lose merit. Probably one of the easiest side quests to complete. Just stay in the battle and fight off the orc waves.
Tips- Orcs hit a bit harder in 6 man so make sure to keep horses healed and enemies away from targets as much as possible
- Don't forget about the horses behind the stables on the east side, orcs will periodically attack here and destroy Plat/Gold if you're not careful
- Place tripwire traps and barricades all along the approach path to slow down attackers and give you more time to DPS.
- If a horse gets really low you have the option to "release" it for a lower merit loss. This is pretty much not needed or worth the time
A Stone Obstruction
Basics
Takes place on the main wall of the Dike. Once the quest begins archers will appear along the wall and once commanded will shoot down the Dunlendings bringing stones to block up the river. Each archer will shoot for about 15 seconds and then must be re-tagged. Your archers on the West side wall will also come under attack and need to be protected. Probably one of the harder quests for the instance, just because of the archer rotation and the quest bugs.
Tips
Guarding the Watch-Tower
Basics
On the western side of the wall there’s a 3-story watchtower near a group of main defenders. Additional orcs and Dunlendings will attack through the main wave and attempt to destroy the tower. This quest can get a bit buggy and overwhelm your defensive line on the west side if too many orcs get behind your soldiers.
Tips
The Statue of Helm Hammerhand
Basics
On the eastern side of the wall (in between the two main defender points) there’s a statue inset on the wall. Pretty much operates the same as the Tower attack with a few extra trolls. You need to protect the statue until you’ve killed 5 trolls
Tips
Flames at the Gate
Basics
In the center section of the wall, archers will appear on the battlements. You need to keep the archers resupplied with arrows and bring down the flame tank hitting the main gate. Probably one of the most difficult as the archers are on the top of the wall and repairing/dousing the door is on the ground level. Also a reasonably hard quest to complete perfectly.
Tips- (From Anolus)First thing is positioning : 1 at bridge 1 dowstairs at gate 2 east side 2 west side ( better if there is one ranged each side )
- Place 1 or 2 catapult on the bridge, set both with heavy or large bullet for long shots ( before machine arrive to the gate) and then use triple shot when war machine is trying to damage the door ( triple shot does 7k *3 each time while heavy bullets does 11k )
- Now when sidequest starts everyone go to their positions and when War Machines spawn first thing to do is to hit them if you are ranged or taunt them if you are a melee , if you see that the war machine is running away , click on it and call in chat/voice the person who have target on, job @ gate is really easy : spam hot onit , extinguish and use officer stance for make haste order for the 2 soldiers that help you with water.
Powder at the Gate
Basics
Behind the wall on the ground level (same as with the horses) orcs and goblins will come from behind to try and blow up the door with explosives. You just need to fight the waves as they come to prevent them from getting to the door. Not quite as bad as Flames solo, but can be difficult if you get a bad round.
TipsLast edited by Gedrevn; Jun 17 2014 at 03:41 PM.
[charsig=http://lotrosigs.level3.turbine.com/0b20c00000000a2d6/01003/signature.png]undefined[/charsig]
-
Dec 02 2013, 07:15 PM #3
 Member
- Join Date
- Dec 2007
- Posts
- 8,561
This is good and helpful. I would like to see some maps at some point, these places are very confusing and some remain confusing even after several play throughs.
There is one side quest not listed for Hornburg. Also there are 5 additional side quests in Deeping Wall only available in the raid version which are not listed, for a total of 9.
-
Dec 02 2013, 07:42 PM #4
 Poster of Note
- Join Date
- Sep 2010
- Posts
- 354
They do. In Searching the Debris you'll have to pull the wounded soliders out of the debris and heal them. Orcs will try to kill these soldiers. Make sure you find and save all of them. A debris is pretty far from the quest tracker on the map so you might miss it. Originally Posted by Gedrevn

Prepare to fall back: The NPC enginneers will set some trap and barriers and fire to slow down the enemies, prepare to fall back. The enemies will try to destroy those objects and kill the engineers.
-
Dec 02 2013, 08:11 PM #5
 Member
- Join Date
- Oct 2010
- Posts
- 932
For the Deeping Comb, Prepare to Fall Back and Searching the Debris seem to be bugged.
They both ended randomly without any reward, despite having a platinum rating for them. They don't show up as complete after the instance is over either.Exploit
-
Dec 02 2013, 09:16 PM #6
Member
- Join Date
- Jun 2009
- Posts
- 62
They aren't so much bugged as bad planning on Turbine's part. The timer for both will sometimes run out before you finish off all the quest mobs, resulting in a failed quest because you did not complete the requirements. I have yet to run into the problem on the Prepare to Fall Back quest, but I also have yet to do it without a tripwire trap and blowing them up at the entrance. The timer on the debris quest runs out shortly after the final wave spawns, so in order to complete it you must be waiting at the entrance. Impossible to get Platinum on this one solo. Originally Posted by TheOrcsBane
This means it would be impossible for you to have Platinum, as unless you have killed all the waves it's simply not possible. You must have had Silver.
Also, to the author. Have you actually seen Vandals in the Tower? I assumed it wasn't in the game as nobody I know has done it in the solo version.
-
Dec 02 2013, 09:58 PM #7
Member
- Join Date
- Apr 2007
- Posts
- 374
Thanks, I have not seem them yet, and they do seem to have some issues surrounding them. Are you sure these appear in solo? Originally Posted by Hiritier
I have not, but it was available in Beta. Originally Posted by Fasin1
[charsig=http://lotrosigs.level3.turbine.com/0b20c00000000a2d6/01003/signature.png]undefined[/charsig]
-
Dec 02 2013, 10:43 PM #8
 Member
- Join Date
- Nov 2010
- Posts
- 83
I have seen vandals in both solo and raid and in solo its bugged and stops at wave 7/8 and never finishes.
-
Dec 02 2013, 11:00 PM #9
 The Wise
- Join Date
- Jul 2010
- Posts
- 179
Thanks for putting this together.
One question: the description for "A Pillage Denied" doesn't include what to do about the "schematics" (or whatever they are called). I have always picked them up but have no idea what I'm supposed to do with them. I've run over to the mill area but nothing else happened.
And… sigh… it's sad how many of your suggestions include the fact that you have to AOE DPS your way through some of this in order to complete successfully (esp. solo). So much for my burglar..
-
Dec 02 2013, 11:22 PM #10
Member
- Join Date
- Jun 2009
- Posts
- 62
AoE dps simply makes it easier, my Lightning Runekeeper has no problem, even when I don't use AoE. I do have a max upgraded tripwire trap, some of the sidequests would be pretty hard without it. But once you get that, you'll be fine. Originally Posted by DanteIL
As for the "A Pillage Denied" quest, you take the four schematics here. There will be a Soldier that will appear just to the right of the door in front of the barrels when the sidequest is activated, he will take the schematics. You don't even have to get off your horse.
-
Dec 03 2013, 12:08 AM #11
 Member
- Join Date
- Sep 2010
- Posts
- 465
Yes. I haven't done a group Big Battle, and those are the only side quests I got in Deeping Coomb. No idea what mobs you guys are talking about for searching the debris, I didn't see any orcs over there. Just a few debris piles that were hard to identify as clickable, one wounded soldier who I healed, and two powder casks that I disarmed. Then time ran out and the quest failed. Originally Posted by Gedrevn
Prepare to Fall Back was OK. Probably easier for classes who have aoes (like DanteIL, I'm really not liking BB's on my burglar - no aoe, and for the most part anything I'd want to cc is cc-immune... ), but at least it's doable and reasonably clear about where you need to go and what you need to do. Better than the vast majority of side quests.
Regarding Guarding the Watchtower in Helms Dike, my impression is that it's pretty buggy. The one time it came up (on my champ) I seemed to do pretty well. The tower only took 30% damage, lots of green numbers for archers saved wherever they were. Yet when the quest ended the result was failure.
There's also the issue that anytime either Guarding the Watchtower or A Stone Obstruction comes up, you'll lose the center-west lane (10 soldiers, 2 commanders, 3 banners), meaning an iron medal for the main quest regardless of how well you do the other two side quests. Or one side quest if the last one is still ongoing when the instance ends. I have no idea how we're supposed to complete those two side quests without losing that lane.
Timing also seems to be an issue in some battles. Helms Dike very often ends before Powder at the Gate completes (the second time the instance ended just as the first wave of bombers spawned!), and I was unable to complete the spiders at the Glittering Caves because the instance entered the final phase before I could reach the queen.
-
Dec 03 2013, 12:15 AM #12
Adventure Organizer 2012
- Join Date
- Aug 2010
- Posts
- 3,418
Nice, I linked it from my Battle Tip Guide for Newbies thread which just provides an initial overview: https://www.lotro.com/forums/showthr...de-for-Newbies
Debris is active in Coomb however, as well as Prepare to Fall Back, the later being relatively straightforward (just waves of MOBs). On the former, the piles seem to active three at a time, perhaps a dozen needed to complete it?Link to our community LOTRO store google spreadsheet pricelist and conversion rates, please contribute too!: https://goo.gl/wxPqCm
-
Dec 03 2013, 09:04 AM #13
 Member
- Join Date
- Jun 2011
- Posts
- 25
I've completed Vandals in the Tower 9 times with 2 characters, on solo. Only once i lost it due to timer issues. Originally Posted by Gohankuten
Marolytrien 100CHP - Drysra 100 HNT - Lonien 100 MNS - Barovius 97 CPT - Strafro 85 GRD
-
Dec 03 2013, 09:24 AM #14
Member
- Join Date
- Oct 2010
- Posts
- 932
Originally Posted by Fasin1
I was in a duo.Exploit
-
Dec 03 2013, 09:25 AM #15
 Member
- Join Date
- Jun 2011
- Posts
- 0
Helms Dike
Flames at the Gate is really easy to get platinum if you've got a decent rank in Engineer. If you set up a small catapult overlooking the gate from the bit of the dike that juts out to the North (towards the ballista) at the start of the battle (ie well before you get the quest) you can heavy shell + 2x crank to do damage directly. I've only tried it since I achieved rank 6 so have the damage + speed upgrades, but I get Platinum everytime.
Deeping Wall
"Securing the Culvert" - You can carry stones yourself by interacting with the rock pile. You have enough time to grab a stone between waves if your quick.
Deeping-Coomb
As others have said "Search the Debris and "Prepare to Fall back" Are both active (indeed I've seen them about 10 times as opposed to 1 set of the other 2).“All we have to decide is what to do with the time that is given us.”
-
Dec 03 2013, 10:44 AM #16
 Member
- Join Date
- Sep 2010
- Posts
- 387
Helm's Dike - Flames at the Gate: high rank engineers can place a small catapult on the battlements right of the gate facing east and preload it before the battle comes. Takes ~4 shots to destroy it without needing to worry about the archers. I've done this once with about 10% damage to the gate but I was slow to start.
Note: you need to have good strategy for dealing with the additional waves that come for the archers.[SIZE=3]NO SLEEP 'TILL MORDOR!![/SIZE]
-
Dec 03 2013, 10:48 AM #17
Member
- Join Date
- Sep 2010
- Posts
- 387
I place two barricades on the eastern side of the lane where the mobs come up and move around the end of the wall to attack the watchtower. I place them behind one another near the soldiers so the mobs have to run through both, giving the soldiers plenty of time to kill them. I also place trip traps in the same area for more time. It also helps to buff the commander(s) there. Originally Posted by J_Howell
[SIZE=3]NO SLEEP 'TILL MORDOR!![/SIZE]
-
Dec 03 2013, 10:49 AM #18
Member
- Join Date
- Sep 2010
- Posts
- 387
A good tip: once you have a few trait points put all of them in Engineer line in one trait setup and all of them in Officer on another trait setup. Then during the battle you can switch trait setups to get maximum benefit based on whether you are doing an engineer or officer activity. It takes a bit of practice to switch quickly (no hot keys available that I am aware of).
[SIZE=3]NO SLEEP 'TILL MORDOR!![/SIZE]
-
Dec 03 2013, 10:58 AM #19
Member
- Join Date
- Sep 2010
- Posts
- 387
Deeping Wall - Breaching the Hornburg: put a trip trap under the window where the mobs spawn. This will immediately stun them giving you time to AoE them down before they spread out and cause mayhem.
[SIZE=3]NO SLEEP 'TILL MORDOR!![/SIZE]
-
Dec 03 2013, 12:43 PM #20
Member
- Join Date
- Oct 2010
- Posts
- 932
Tried the Debris one in Deeping Comb again...
I'm not sure if it's even possible to finish in that short amount of time. I was at 4/9 Waves for the Goblin Vandals when the timer ran out, and I'm not sure if I even got all the debris because AFAIK it doesn't indicate how much you need to search, let alone where it is.
Edit: This time I was solo, on my Warden.Exploit
-
Dec 04 2013, 01:15 PM #21
Riddle-master
- Join Date
- Apr 2007
- Posts
- 1,224
For Helm's Dike solo (and I mean truly solo)
Requirement: Rank 3+ Engineer. 4 is better.
Place your 2 barricades on the west center side. Going up the ramp in front of the soldiers, where there are some dead soldiers, there's a boulder on one side and the wall on the other. place the first one there creating a choke point. And the 2nd one right behind it.
Place one of your Catapults right next to the officer closest to the watchtower. Place another catapult in the ledge where the watchtower is, where one of the Archers for a Stone Obstruction spawns.
When the battle starts and the west side gets attacked, go to the catapult you placed in the watchtower area. Load it with the Rank 4 shell if possible, and the 2nd powder (the one that does damage over time). And fully crank it and fire. It should hit all 3 orc formations. Just spam it and you'll quickly get rid of all the orcs that assault that side.
The Watch Tower and Stone Obstruction side quests seem to be tied to enemy deaths from the far western ramp, so you should be able to wipe out the central western formations before they pop up.
Once Stone Obstruction pops up, just run back and forth between the 3 archers. The soldiers should be able to easily take care of the dunlendings that run past them since they no longer have to deal with the enemy waves.
If you get Watch Tower then use the catapult you placed next to the commander with a Heavy Shell and 1 crank and create a murder zone. No enemy should be able to get past that commander. So long as the watchtower doesn't get damaged, it shouldn't bug and fail to give rewards.
You can place a catapult between Gamling and the rope which can deal with the war machine with only 1 crank and a heavy shell. Though it can run the risk of getting hit by a stray mob that gets past the west central group.[charsig=http://lotrosigs.level3.turbine.com/0b20c0000000b3969/01007/signature.png]Minarfin[/charsig]
-
Dec 04 2013, 08:09 PM #22
 Member
- Join Date
- Mar 2008
- Posts
- 1,095
I just discover that you can still use your class skill WHILE using engineer's panel. This is useful to DPS and repair banner/disable explosive casket while still DPS the upcoming wave. Especially useful in the Glittering Cave's side quest 'Preparing the Charge'
[I]"Deserves it! I daresay he does. Many that live deserve death. And some die that deserve life. Can you give it to them? Then be not too eager to deal out death in the name of judgment. For even the wise cannot see all ends"[/I] - [B]Gandalf[/B]
-
Dec 04 2013, 09:00 PM #23
Poster of Note
- Join Date
- Sep 2010
- Posts
- 354
Yes you can. Another reason why you should pick up hunters for BB spots. Other classes is kind of under-use. Originally Posted by TKH
-
Dec 04 2013, 09:56 PM #24
Member
- Join Date
- Mar 2008
- Posts
- 1,095
^Rune-Keeper, Minstrel, Warden can also do the same. Guardian and Champion still have bow to aid the fight. Lore-master and Captain have their pets. Not sure about Burglar
[I]"Deserves it! I daresay he does. Many that live deserve death. And some die that deserve life. Can you give it to them? Then be not too eager to deal out death in the name of judgment. For even the wise cannot see all ends"[/I] - [B]Gandalf[/B]
-
Dec 05 2013, 12:55 AM #25
Member
- Join Date
- Dec 2007
- Posts
- 8,561
But this is the snag. Someone soloing is probably not going to get to that rank. 60 points for rank 3, 80 for rank 4. Originally Posted by Golledhel
Doing all side quests solo and getting silver in each plus silver in main quests (only first time counts) you get 60 points. But getting silver is a stretch solo, much less on every side quest, especially while having everything ranked so low. Your typical player is going to give up before they get to this point.
So the first big problem I see here is that you really do need multiple people to start getting better at BB, even if it's just a duo. This is very very different from skirmishes where you could build a decent soldier while soloing, then have it good enough to join a skirmish group. The second problem is that the BB traits tree is very annoying; each new rank in a trait is more expensive then the last, not at all like the class or mounted combat trees; plus you're forced to again take completely unwanted traits just so you can reach deeper into the tree to get something useful. It really does feel designed to frustrate and annoy the solo or casual player.

 Reply With Quote
 Posting Permissions
Powered by vBulletin® Version 4.2.3
Copyright © 2024 vBulletin Solutions, Inc. All rights reserved.
Copyright © 2024 vBulletin Solutions, Inc. All rights reserved.
All times are GMT -4. The time now is 09:11 AM.